
There are two ways to start soundcheck for a band. To determine which to use, look at the theatre’s marquee. If it’s an individual’s name on the marquee, take the fader for that individual – vocalist, banjo player, whatever – and push it to +5. Now turn up the gain until the mic feeds back. Pull the fader back to 0 (unity), and soundcheck is 90% done. Fit everything else in underneath.
If a rock band’s name is on the marquee, take the fader for the kick drum and push it to zero. Now turn up the gain until the kick is the right volume for the room. Check the output meters for the board. If they aren’t totally pinned, you’re in a good spot because you’ve got enough headroom to do the show properly. Pile the rest of a rock band mix on top of that and you’ll have a great-sounding show.
The reason I started working this way is because, at the end of soundcheck, every single fader should be at unity. That way, during the show, you’ll have the ideal throw of your controls. It’s tempting to turn the gain knobs up until the pre-fader meter on each channel reads 0 dB. But that’s a mistake because then you’ll have to run half the faders at the bottom of their range, and down there a 2 mm move is a 10 dB of volume change. You’ll have no ability to make subtle mix moves. Not good.
Only after years of soundchecking this way, pushing up faders and then adjusting gains, did it really occur to me, “How do I know when the kick is loud enough?” It didn’t really seem to be a specific dB level… every room just had a certain volume where the kick sounded right. It felt very natural to mix by just turning everything up until it sounded right. Unable to think of a technical answer for why this worked, I eventually mentally cataloged this concept as part of the “art” aspect of engineering.
The idea of turning the fader to unity and then sorting out the gain backward from there was the total opposite of how I approached gain in the studio, at the time. In the studio, it all started with outboard mic preamps, which needed to be set to deliver proper level to the recorder. When working with analog tape, the concern always was to not let the level to tape get too low (too much noise-to-signal on playback) or too high (overload of record electronics, undesired tape saturation). With 16-bit audio this problem was made even worse; the struggle was to maximize bits used, while running the analog to digital convertor at its optimal level, while also avoiding dreaded digital overs. Then, during mixdown, fader creep would set in as different tracks got turned up to be “loud.” Eventually the mix bus would be pinned. Partway through a mix, every channel would need to have the gain pulled back 4 dB because I’d run out of headroom.
But one time I mixed a record “backwards” by turning up until it sounded right. It was a duo record [Envisioning], with William Hooker on drums and Lee Ranaldo on guitar. William Hooker sat behind me while I was at the board. He’d enthusiastically call out how to do the mix. We started with the faders all the way down. “Turn up the drums!” I turned them up. “More! Louder, man!” I was at a good spot on the mix bus, so I just started turning up the monitor volume. “Okay, stop! Now turn up the guitar!” I turned up the guitar. “Okay, stop! That’s the mix! Print it!” It seemed totally insane to me to mix a record like it was a concert, but that was his process. Years later, I finally figured out there was some science to the art that William Hooker and I were intuiting.
Trying to educate myself more about the “technical” side of recording, I read Bob Katz’s [Tape Op #116] Mastering Audio: The Art and the Science. This is where I was first introduced to the concept of monitoring at a consistent volume. It had never occurred to me to do that. I was used to listening at a moderate volume in the control room while the band did takes. But, inevitably, the band would have blown out their ears while on the studio floor, so when they’d come in we’d have to blast the control room monitors so they could evaluate the take. This same haphazard use of the monitor controller spilled over into mixing. Maybe somebody would be taking lunch orders, so the monitors would get turned down and stay there for the next hour, or someone wanted to cut an overdub in the control room and the level would get stuck at 95 dB for a while. Astute readers are already palm-slapping their foreheads with how foolish this was.
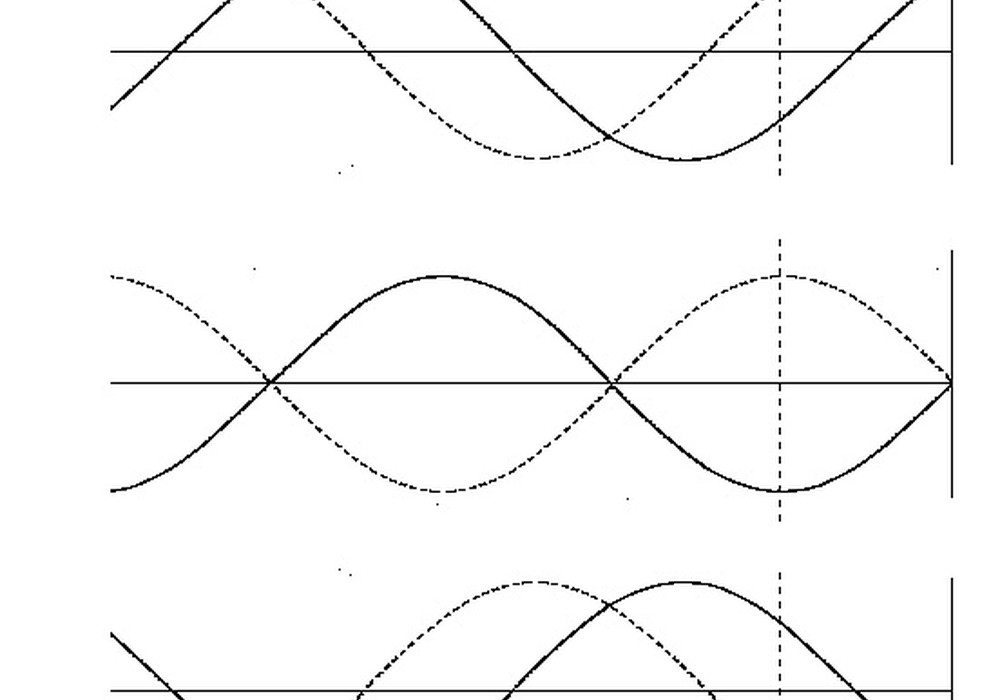
As many others had learned before, there actually is a specific proper volume to monitor at: 83 dB. This is the best volume to monitor at because of the loudness contour of the human hearing system. Although we can hear from about 20 Hz to 20 kHz (yeah, right), our hearing response is not flat; it has a contour to it which is dependent on volume (the evolutionary biological reasons for the shape of the contour are contested). The loudness contour was first described by Harvey Fletcher and Wilden A. Munson [known as the “Fletcher-Munson curve”] in 1933, and though it has been refined through the years, one takeaway remains unchanged: the contour is dynamic. It has a different shape, at different volumes. Our hearing is flattest around 83 dB.
Trying to mix at optimal monitor levels requires a bit of rethinking on how to approach gain staging. Instead of starting with the source, the key is to work backwards from 83 dB and game the system so that all your levels are optimal. First you have to be aware of how much dynamic range your content will likely have. If you’re mixing something very dynamic, like a feature film or classical music, Mr. Katz suggests setting your monitor controller so that pink noise played at -20 dBFS (below digital full scale, a.k.a. the top of the meter in most DAWs) reads 83 dB C-weighted on an SPL meter. For genres with less dynamic range (pop, widely defined), the suggestion is to make pink noise at -14 dBFS equal to 83 dB. Once you’ve done this, your room is – get ready to feel fancy – calibrated. This is how mastering engineers work. This is how big-time film mixers work. I’m feeling fancy for you already.
Now, when starting a mix, you just turn the faders up until each thing sounds like it’s the right volume. Take a glance at your output meters... they will probably be perfect. This system worked great for decades mixing films on analog recorders, and now, with 32-bit digital, we have an astronomically greater amount of usable dynamic range. You’ll probably be leaving your mastering engineer a nice amount of headroom, and your mixes will all be at similar levels. Furthermore, you’ll be less tempted to smash mixes with brick wall limiters. If your monitor gain is that high, and you brick wall your mix at -.1 dB, it will be physically painful for you to be in the room.
Of course, tracking is still a crapshoot, as far as monitor levels are concerned. If I was a musician paying to be in a recording studio, I’d want to hear the take played back loud as hell too. But maybe when you pull the patches and switch from “tracking” to “mixing” mode, you can set the monitor level at your calibrated position and convince the band not to touch it.