My own experience in the recording world goes back about eight years to the summer before my senior year of high school. It was then that I bought a Sansui 6 track cassette recorder, and began recording my songs. In the next few years my band (now The Marinernine) recorded a few demos on that machine, but soon felt it necessary to make the jump to the "real" recording studios, where we had every experience from complete studio euphoria (where the idea of becoming a household name first kicks in) to utter disappointment. In 1995, after years of being away from the DIY life-style, I bought an eight track and started a studio along with my partner Jason (who also plays in the Marinernine, as well as the recent international ambient/noise craze The Azusa Plane).
Miner Street (our studio and record label) is still eight tracks and running strong. We just bought a new console, an Allen and Heath Saber 24 X 8, which I must say, should be the envy of all you motherfuckers. But as nice as that is, there are still times when my friends need more than eight tracks. And if I can't give it to them, they'll probably find some ADAT studio down the street that can for half the price (some friends, huh).
By figuring out the following method for efficiently bouncing tracks, I have actually saved myself from the above scenario on only a few occasions. But I feel like I have learned something of a lost art form. Most people I know think of bouncing tracks only in terms of four track recording. But with half-inch tape, and better yet, the tape compression that comes with it, the results can be beautifully rich and clear as a bell. And although I have never read any of those books on how the greats recorded in the sixties, I am pretty sure that some of the principles laid out here are the very same as they were back then. Give this a shot, and let me know what you think.
1. Record the raw tracks (e.g. rhythm guitar, bass and drums).
From the start, remember these two key guidelines:
- Always strive for as much separation as possible among instruments. In other words avoid guitars bleeding into drum mics, bass, mics, etc.
- At the same time, always strive for as much of an instrument's natural ambiance as possible. For this, experiment with mic placement to achieve optimum warmth and minimum bleed.
For the drums, there can be many different approaches. There's the one-drum-per-track method in which you can close-mic each drum to its own track with the addition of a room or overhead mic track. For this you can use every available track left over after your initial guitar and bass (or whatever you may be tracking initially) have been accounted for. Another approach would be to sub out the drums right off the bat (provided your mixer has sub-outputs). I think I do this out of habit, because I am so used to having to sub out the drums in normal recording scenarios. And if your intention is to send your bounce mix directly to two tracks on the tape, then it is necessary to sub mix the drums (I don't recommend this, though... see sec. 2 "Make your Bounce Mix" below).
Drums can be submixed nicely to either two, three or four tracks. On two tracks you could make a loosely miked stereo mix. By miking loosely, you allow for some of the room ambience to liven your sound a bit. It'll keep things from sounding too dry, and it will actually help the drums to blend with other instruments. On three tracks, there are even more options. There's the kick + snare + everything else method, in which the kick and snare are close-miked to their own separate tracks and then one ambient mic picks up everything else on a track by itself. Take some time putting that mic in different locations and proximities to the kit to feel out where the best place in your room is. This leans heavily in the direction of the live room sound, which is nice, but you run the risk of loosing control over things like cymbal bleed, etc. For me, I find it very hard to maintain balance and separation of drums in my small cutting room using this method. My favorite method, on the other toe, is the close-miked stereo mix + overhead and/or room mic approach (say that fifty times as fast as you can). I think this gives the best of both worlds: up close definition and separation of each individual piece of the kit on two tracks, brought back to life with some room ambience on a third track. If you have the option of a fourth track, try this with stereo overheads or room mics on two tracks instead of just one. This is not, of course, an exhaustive list. There are many more methods, but any of the above are a good place to start.
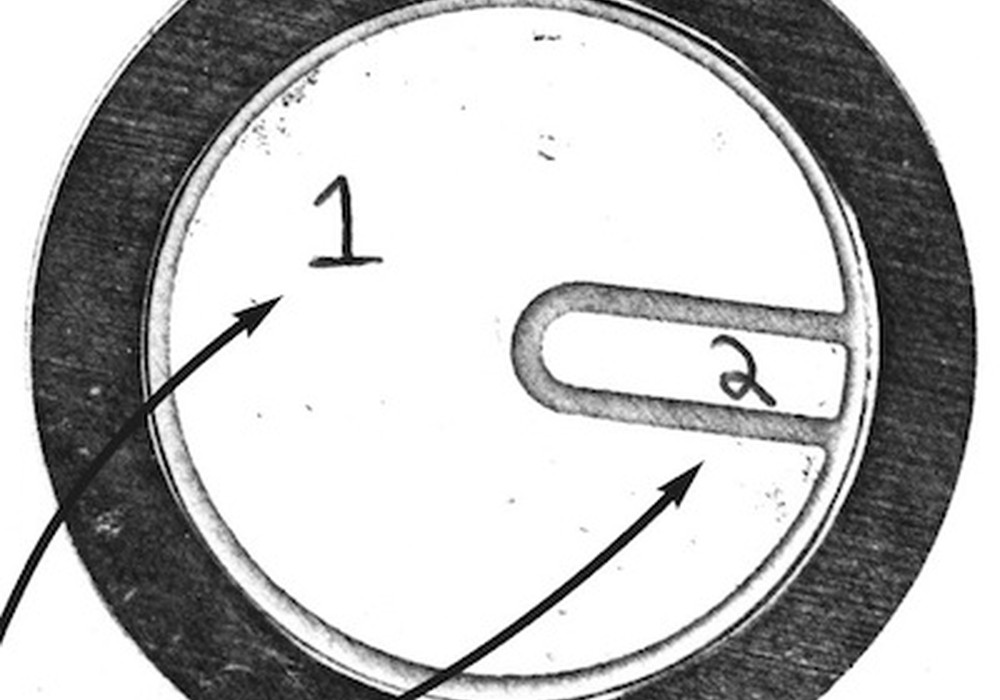
One thing I should mention briefly before going on, is phase. Without going into a deep explanation of this phenomenon, I'll just say that often when two mics are engaged upon the same instrument (e.g. the drums) they can be out of phase. You'll know this is happening if the two mic signals listened to simultaneously produce a weaker signal than either one by itself. This happens a lot on drums, since, for instance, a rack tom mic may be picking up some snare drum as well, which has its own mic already. Always do a quick test for phase by panning all your drum tracks to center, turning each on, one at a time, then in pairs, all the while listening for volume decreases. To correct phase, either your mics have to be moved into different positions which are in phase with each other, or, if your console has phase reversal buttons (usually marked by a zero with a slash through it), you can fix the problem that way. The only other option would be to alter some XLR cables specifically for phase reversal. To do this, simply switch the wires at...