Manley Laboratories had been building custom mastering consoles on a case-by-case basis, but the waiting list grew too long to manage. (I know - I've been on it.) In a nutshell, it takes a long time to build each one from scratch. And it turns out that many mastering engineers request the same features anyway. It became clear that adding a dedicated mastering unit to the Manley product line would address the needs of many studios, be cheaper than a one-off box, and decimate the waiting list. Finally, in the summer of 2008, the first production Mastering Backbone units began shipping.
When it comes to outboard gear, a mastering engineer has three options: a fixed chain, patching (directly or via a patchbay), or a mastering console. Each has advantages and disadvantages. In a fixed chain, the gear is connected in the same order all the time. A unit is removed from the path via bypass switch. If you're using all of your gear at all times, a fixed chain has less wiring. However, anytime you bypass a box, there can be a concern. Not all bypass functions take the entire unit out of the signal flow. Many bypass the internal processing but not the input and output transformers; a surprising number of hardware units implement this kind of semi-bypass, including mastering gear. At the mastering stage, unnecessary gear should be removed from the chain; extra elements are not always desirable for the final product.
Patching is another option. Since connecting gear requires crawling underneath poorly-lit desks, most engineers opt for a patchbay. I spoke with two Grammy-winning mastering engineers who have deployed patchbays. Both had custom-made high-quality setups. One told me that his patchbay uses short-wire runs, is sonically invisible, and he continues to use it. Based upon the CDs he's done, all I can say is his work sounds impeccable. The other engineer told me that as soon as he replaced his patchbay (and the extra wire it required) with a mastering console, clients called to say they could hear the difference, with one commenting, "You've really upped your game." And while I'm certainly not going to resolve this issue today, it is my personal opinion that a well-made mastering console is preferable to a patchbay. (Of course, the patchbay is much cheaper.)
This leads to the mastering console. Gear is connected to a central console, but the engineer chooses which hardware participates in the processing. Unused gear is truly bypassed this way. Presently, there are a number of commercially available mastering consoles. All of them are a little different from one another in terms of features and implementation, but in general, they all provide gear insertion.
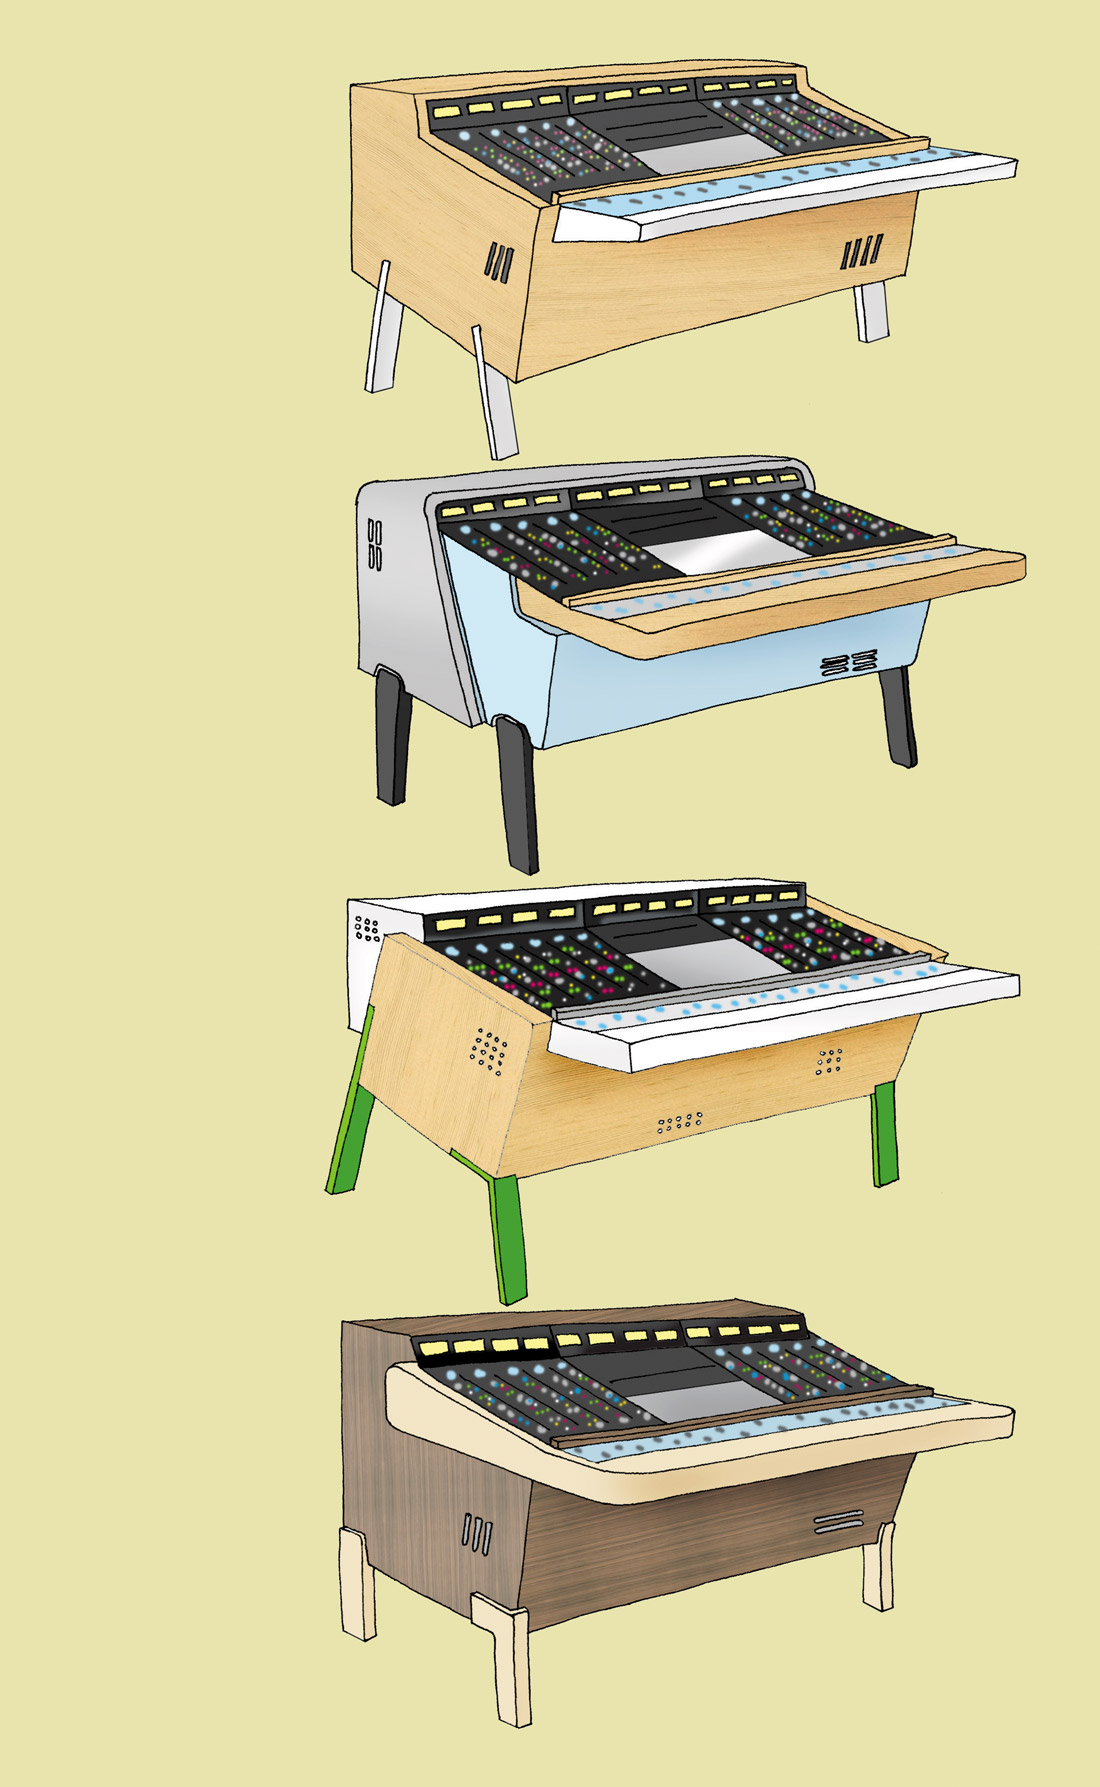
The best way to explain the features of the Backbone is to follow the signal flow left to right across the front panel. At far left are three sets of balanced analog inputs for the source. This allows you to try different converters, add a tape machine, etc. Next are buttons that allow the left and right channels to be reversed, enable the gain rotaries, and provide the ability to reverse signal polarity. Two 24-position rotary switches provide an adjustment range of -5.5 dB attenuation to +6.0 dB gain. At zero, they are passive.
Eight insert buttons span the middle of the unit. Depressing a button illuminates it, adding the corresponding unit to the chain. (Behind the scenes every insert send provides a full-time signal driving its respective unit. Depressing the insert switch simply adds the processed signal into the mastering chain by activating the receive jack. This feature is critical for evaluating compressors, as I'll detail later.) I used clear labels on a Brother label printer to add names to each insert. That way, I didn't need to remember which box was in which insert. You can also remove the switchcaps and place paper or a clear label inside the button. In addition to adding or removing gear from your chain, some of the Backbone's insert channels have additional capabilities. These extra features are enabled by pushbuttons located below their respective inserts. Gear plugged into inserts 2 and 3 can take advantage of a sum/difference Matrix (often referred to as 'mid-side' processing). Inserts 4 and 5 can be swapped in order (meaning the signal would flow to 5, then 4, before going to 6). Next, there is an injection point between inserts 7 and 8. A 3-function button allows you to do one of four things. First, you can add the input's difference signal (side of the mid-side). This adds some of the out of phase signal from the input to the output, which has the effect of widening the stereo field. Another option is to mix in a parallel signal between inserts 7 and 8. This allows you to add reverb, or parallel EQ or compression. Another option is to use the knob as a fader to take full use of the Penny+Giles rotary. Of course, you can do nothing, simply passing the signal from insert 7 to 8. Finally, there is a set of stereo knobs that control output from the Backbone. Similar to the input gain switches, these rotaries provide an adjustment range of -5.5 dB to +6.0 dB at the output. While some of this may be daunting to read in print, in use the features are very intuitive.
Hooking up the Backbone requires a little planning. The inputs and outputs are connected via built-in XLR connectors. However, gear inserts are connected via ELCO or DB25 snakes. These snakes are not included and must be custom-made or ordered from a vendor (and yes, Manley can make them as an additional-cost item). My only issue with the Backbone came at this juncture. You need to order snakes that are long enough but also have sufficient spread. The snakes I received from Manley had about a foot of spread at each set of connectors. However, not all gear features I/O connectors near each another. Ironically, I had the toughest time with my Manley Massive Passive and Manley Variable Mu, which are designed with left and right connections at opposite ends of the rear panel. So, I had to use a razor blade to remove the outer sheath of the snake and separate some of the cable ties that paired channels. None of this was too difficult, but it would have been easier had I better specified my needs when ordering the snakes. Lesson learned - take the time to crawl inside your mastering desk and do some measurements; it will be well worth it come installation.
Putting the unit to work, the first thing I noticed is the Backbone is pretty much invisible. Testing all inserts engaged while looped back to themselves, the noise floor was below 95 dB. Anytime you add more gear and wires, it's easy to be skeptical of added noise. So hearing, rather not hearing, is believing. Hooking up real gear, I filled the first inserts with analog equalizers. Prior to using the Backbone, I had to use plug-in equalizers or digital units like the TC Electronic System 6000 (Tape Op #43) if I wanted to do M/S EQ'ing. I had toyed with purchasing a mastering-grade analog M/S switcher, but it cost over $1200. I'm glad I waited for the Backbone. Being able to use analog gear in this capacity can be a blessing. And while I don't use M/S on every project, there are times when I'm called to correct some small mix problems that can only be addressed this way. Also, my Massive Passive, which got little use in stereo, is now my go-to M/S EQ. It's worth mentioning that some of my peers like to use compression in a sum/difference mode, and you could do that, too. That's not my bag, but if it's yours the Backbone will let you get to it.
I confess that it was ten months before I used the Swap button. But on a recent Blues CD, being able to put a darker compressor before my low-end tightener was the perfect thing to turn the entire mix into a smooth, glassy piece. Prior to that project, the two pieces of gear worked better the other way around. But I was able to flip them and it made all of the difference. This feature brings up an important area of consideration. Most analog mastering consoles provide a fixed insert order. But there are digital switchers that have more flexibility, including units that let you put any gear in any order at any time. Which design is best depends on your personal working style. In theory, the ability to patch anything in any order seems ideal. But that's the logic of someone accustomed to plug-ins, not outboard gear. Anyone used to hardware can tell you that there is a lot of trial and error determining which unit works better feeding another unit. In mastering, once you find an optimal chain, it is often rare to leapfrog around. So for me, having only one Swap option is fine. Others might find it insufficient. Again, this issue does come down to personal preference.
Another feature I shied away from was the parallel slot that lives between inserts 7 and 8. Now, the obvious use would be a compressor or EQ allow you to do things that are normally reserved for the digital realm. But I was working on a Rap CD where the client asked if I could use my old BBE Sonic Maximizer. Once slapped on masters like french fries on a Pittsburgh sandwich, most of those old BBE units now pull duty in live and mix rigs. We even tried a flange from a Lexicon PCM 90. Ultimately, we went with the BBE, but the Backbone gave new life to this otherwise retired gear.
Thus far, I've explained how much easier my life has been with the Backbone. And that's true, but it still might leave many wondering if buying one is worth the investment. I have one more observation on the matter, and it deals with auditioning compressors. Let me suggest that you have never fully evaluated a compressor until you've A/B'ed one with the Backbone. Since the Backbone constantly feeds signal to all of the connected gear, the instant you insert a compressor, you hear it at work. Conversely, auditioning a compressor with the compressor's built-in bypass button has two problems. First, it may not be a true bypass for the I/O electronics (as previously covered). But more importantly, a bypassed compressor has no control signal flowing to its detection circuit. Once the bypass is disabled, the compressor needs to ramp up to the new audio signal. This sounds distinctly different that a compressor that is already working. I spent two days going over options with every compressor in the building. Compressors I believed I knew intimately, sounded completely different once they were tested with the Backbone. Without naming names, there were some roster changes at Treelady, all thanks to the Backbone. (I can only surmise what similar revelations will occur when tracking engineers test Manley's MicMaid mic/preamp matrix-switcher on their prized microphones. And I'm happy not to have that problem!)
Mastering rigs come down to personal preference. For example, there are well-respected names who are satisfied with four inserts; their signal chains typically use few pieces of gear or group multiple units together. Personally, I find a four-insert limitation to be a deal breaker. The Backbone provides eight analog inserts (nine counting the secret slot between 7 and 8). There are a number of dedicated mastering insert boxes on the market. The Backbone adds repeatable, high-resolution gain switches; sum/difference processing; and much more. Unless you are often rearranging the order of all your gear on-the-fly, the Backbone will do it all. Speaking of doing things, I need to get some money to Manley Labs, because I'm not giving up my Backbone. ($6000 MSRP; www.manley.com)
_disp_horizontal_bw.jpg)